Babor Nail Makeup

I recently had the opportunity to try out a few products from Babor's "nail makeup" line. Prior to checking them out on Beauty Press, I had never even heard of the brand before, so I totally went into this one blind. The company was nice enough to send me out a few polishes, as well as a cuticle remover, nail treatment oil, & their "all in one" polish.

From L to R: Nail Treatment Oil ($13), Ultra Performance Nail Color in Aubergine ($13), Cuticle Remover ($13), All in One Polish ($13), and Ultra Performance Nail Color in Fuchsia ($13)


I found the cuticle remover thing pretty interesting because typically - I just hack at them with one of those orange sticks & then attempt to smooth out the remnants in order to make my nail beds look like they haven't been chewed by a wild animal. This really simplifies that process quite nicely.. lol. You just brush it on (it's a little bit thicker than a nail polish... more of a gel) to your cuticles and let it set for about 5 minutes. Then, you can use the provided orange stick to push them back smoothly and easily and it doesn't leave that awful flaky look behind.

The all in one polish is pretty multi-purpose and you can use it as a top coat, a base coat, or just wear alone for shiny nails. It's enhanced with stuff that's good for your nails, too - so it's working magic, as well. I used it as a base coat & then a top coat. It does have a yellowish tint to it, but it doesn't show up like that on your nails. I find it SUPER ANNOYING when top coats discolor your polish - but this didn't do that.

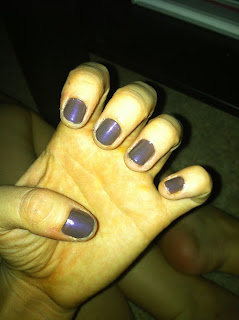
As for the colors - I applied two coats of the purple one (aka Aubergine) and it covered really well. You definitely need more than one coat (in my opinion), but it's fast drying so you don't have to wait an hour and a half in between coats.


A big bonus for me was that none of Babor's nail products contain methylbenzene or formaldehyde. I recently found out that a lot of nail polish brands use formaldehyde in their nail hardeners/strengtheners - so any of them that definitely DO NOT contain that ingredient get bonus points in my book. I prefer my cosmetics without embalming agents.

If you'd like to check out Babor's nail makeup line or any of their other products (they also manufacture cosmetics, skin care products, & more) - you can check out their website here.

Thanks again to Babor for their generosity & allowing me to work with them! It was an absolutely pleasure :) Have a great week, everyone!


Photobucket

Honeycat Cosmetics Review

I recently had the pleasure of receiving a review package in the mail from Honeycat Cosmetics a few weeks ago. I had never heard of them before, or tried any of their products - so I went into the entire thing blind. I was, however, extremely thrilled to discover that they taped the package they sent me with pink zebra packing tape, the tissue paper inside was leopard print, and the packing peanuts were pink.

If there is one way to perfectly package something for me - Terry from Honeycat freaking nailed it.

Anyways, they sent me quite a few things which was so awesome and sweet of them. When brands go above and beyond for bloggers, that really says something about them (in my opinion, at least):


Unfortunately, the "Amenity Kit-ty" (which is the set in the top left corner) is not available for purchase, but the rest are. They include:
- Chick of the Sea Bath Salts $10.00
- Whisker Slickers "I'm in Heat" $6.00
- Vanilla Butter Cream Grooming Bar $6.00

Everything is packaged in such a cute way. I love her little cat mascot that finds her way onto all of the packaging, too. I really want to comment on both the "I'm in Heat" lip balm and the "Vanilla Butter Cream" grooming bar, because those are the two items that really stood out to me from everything I was sent.

The lip balm is a "warming cinnamon" formula, so I was really skeptical at first because I absolutely hate the feeling that lip plumpers give you. I was really surprised (in a good way) that the sensation this stuff gives you is really mild and not annoying or distracting at all. It doesn't have a color or tint to it, so it's really just a nice lip balm you can wear under gloss or lipstick to make sure your lips don't get dried out. It's not greasy at all, and it tastes really good, too! For $6 - this is a really nice product.

This Vanilla Butter Cream grooming bar has quickly become one of my favorite bath & body products, as well. I don't typically use bar soap - but this stuff is worth making an exception for. It smells really fantastic - it has mainly a vanilla scent, but you can pick up hints of almond (which is one of my favorite scents ever), too. 

Honeycat has a whole website full of really cute stuff that I encourage all of you to check out. Everything I received (especially the body lotion & shower gel) smelled absolutely amazing & was packaged so adorably. If you're into the whole vampire thing, too - they have some vamp themed products that are really cute (Blood Sudz shower gel comes in a mini coffin!). Honeycat isn't a brand that I see often in the beauty blogging community, and that needs to change because they're such a fun company! To view their full collection on the website, click here.

Hope you all had a lovely weekend! Here's to a speedy work week ahead :)


Photobucket

When Practicality Wins

I've been blogging long enough for people to know that I am not the kind of person that feels it necessary to spend a lot of money on things. I am not a girl that requires designer things, I don't like being fancy, and I am about as practical as it comes.

My mom recently won a couple gift certificates to a really expensive jewelry place here in Pittsburgh called Casa D'Oro. I have literally never bought anything from an actual jewelry store in my entire 25 years on the planet earth. I'm fucking content with my $6.50 bracelet from Forever 21 every day:

looks fine to me.

But alas, I went to this extremely overpriced junction of sparkle with my mom. I had a certificate for $100 to spend, and of course you could only use it on one thing, so I looked around for like an hour and a half. I don't know - even though the thing I picked would technically be "free" - I could not justify any of it. $100 for a freaking ring that looked like it came out of a gumball machine (to me, at least) just seemed so ridiculous and it was making my stomach hurt. My mom kept suggesting, "well why don't you get these earrings?" and yeah, they weren't ugly, but I can't justify having literally a hundred dollars sitting in a drawer in my room. I know I wasn't PAYING that, but that's essentially what it would have been. I didn't like them that much, I would completely just be getting them to get them. I'd probably forget about them in a few weeks. That didn't seem fair.

After walking around forever, I decided that I wanted one of those Pandora bracelets, because I could see myself actually wearing it and I like the fact that you can really customize them to fit your personality. They aren't insanely overpriced and they are more my speed. Unfortunately, the starter band was $65 and I could tell my mom was disappointed that the rest of the certificate would be wasted. I could tell this because she was literally spending the entire time we were walking around attempting to talk me out of it lol.

After the lady who worked there and my mom were reaching the ends of their ropes with me, I finally just ended up with this $110 ring:


I was honestly just super uncomfortable. This girl and my mom were both clearly annoyed with me and I just wanted to get out of there. I did exactly what I said I didn't want to do and just got something to get it.

Got home, and immediately regretting not just eating the $40 and getting what I actually wanted. I can't justify owning this. I don't like it. It's not my style. It deserves a good home, it really does. It deserves to be appreciated for all it's worth - but I had it on for about 15 minutes before I just couldn't pretend I liked it anymore. It's pretty, it's sparkly, and it's a lovely ring - but it's just not for me :( I'm in a really bad mood over free jewelry... sad, isn't it? 

So if you want to buy this ring, it's currently on eBay for $10 less than it retails for and free shipping. If you like it or know someone that would (mother's day is coming up) - please oblige me and either place a bid or buy it now. I'm sort of sick to my stomach knowing that $100 is sitting in a box on my coffee table right now being unappreciated and unworn.

It's technically a size 7, but my fingers are honestly closer to a 5-6... so it runs a little small. I was wearing it on my pointer finger for the 15 minutes I had it on..lol. It's brown smoky quartz with 14k gold and sterling silver. Please give it a good home so I can stop hating myself.

To go to the eBay auction - please click here
It only runs for 3 days.


Photobucket

Temporary Hair Color with Hair Chalking! (& some Senna Cosmetics)

So I have been seeing a lot of beauty bloggers doing this hair chalking thing, so I figured I would give it a go. Since doing something to yourself is usually a hell of a lot harder - I recruited my friend Kelli (aka Same Name) as my guinea pig in this endeavor. You might remember her from my Prom makeup posts awhile back. She has huge boobs.

What you need (and I'm doing this in the cheapest, most cost effective way possible. I am not going to tell you to go out and buy all kinds of expensive shit that you don't really need):

- Soft Pastel Chalks (do not freaking buy oil pastels or you will HATE YOUR LIFE)
- A handful of plastic sandwich bags (if you plan on doing a lot of strands, you'll need more - I used these instead of rubber gloves because I don't have rubber gloves laying around my apartment for fun)
- Container of water (I used a Cool Whip tub)
- Blow Dryer
- Straightener

These are the pastels I used.. 
I got them at Pat Catans craft store & they were like $6.99


Here's what our finished product looked like:


Step 1: Dip the strand of hair you're going to dye into water. I varied the sizes of strands I did on Kell, but I wouldn't go much bigger than like an inch or so. Unless you plan on dying the entire strand from the root, you only need to wet the parts that you want to have color on them (about halfway up if you're just doing what we did).

Step 2: Dip the tip of your chalk into water and then color the strand while holding it in your hand with a plastic baggie over it. This part gets pretty messy, so the baggie helps a little bit. Make sure you don't rub the strand back and forth or up and down because you will matte the shit out of the hair and whoever you're doing this to will want to strangle you. Just use a downward motion and try and spread the strand out so you don't miss any sections.

see how it's all over my hand? 
the baggie makes it easy to just color it without getting it all over yourself

Step 3: Once your strand is colored, let it air dry for a few minutes and then hit it with a blowdryer to dry it out a little before you straighten it to prevent frying your hair. If your strand is really knotty (some of them will get like that, there's no preventing it sometimes), try and brush it out GENTLY before you dry it. If you brush it after it's on the dry side, you're going to get a bunch of chalk dust flying around and you'll lose some pigment.


Step 4: Once your strand is dry (or mostly dry), run it through a straightener to seal in the color. I didn't turn my straightener up all the way heat-wise since some of the strands I was going over were still slightly damp, but it's up to you. I also curled her strands during this part, too - but you can just straighten them if you don't want curls. NOTE: THE CHALK WILL GET ON YOUR STRAIGHTENER BUT IT WIPES RIGHT OFF SO DON'T WORRY !!

We also used a double color technique where we did some strands red on the bottom and then purple on the top.. It looked pretty because they kind of faded into one another whenever we dried them. 

And just a couple tips - the chalk dust got on Kell's shirt a little bit, so you might want to wear something you don't really care about when you're doing this. It wasn't anything crazy though, so you don't need to go buy a poncho or anything. 


And since we were doing hair, I also did her makeup :)
I used Senna's "Itsy Bitsy Lashes", which are just meant to go on the outer wing of your lashes & are great for a more subtle look. They definitely did enhance her lash line even though they're small, though. I'm a big fan of them and they come with glue right in the package. I also smudged some of Senna's Black Violet Velvet Eyeliner on her lower lash line, as well. I did a post on that a little while back.

Purchase Senna's Itsy Bitsy Lashes here!


Hopefully this gives you guys some creative ideas for things to do with your hair this spring & summer! The chalking could be really pretty with prom hair if it was worked into an updo, as well :) Let me know if you will be experimenting. Thanks for reading, as always! XO!


Photobucket

Current Obsession: Blazers!

I do these obsession posts from time to time and since I've recently been pretty into blazers - I figured I would share. I'm not here to write a long-winded post telling you how to wear them and all that shit because I think it's pretty self-explanatory, but blazers definitely aren't just for work anymore. These two I'm going to show you, however, are pretty awesome because they're not made of that stiff "dress clothes" fabric. They're jersey knit and extremely comfortable.

Wear them with skinny jeans. You will look hot.

The pink one is from Charlotte Russe ($38.50) and the white one is from Wet Seal ($29.00).. You can't really tell in the picture, but the Charlotte Russe one is long sleeved & the Wet Seal one is three quarter-length.

I just got both of these within the past few weeks, so I'm sure if you checked out either of those stores they would have them in stock! Wet Seal had the white blazer in a few different colors, as well.


(say hi to Julia.. that's the one with the cute nails all the time!)


Photobucket